

This article describes how to configure a client for the Fidelity Deduction Feedback to ReadyPay moov definition used for 360 integration. Each client configuration will vary based on their plan specification and will need to be configured accordingly.
Create an SFTP Account in detamoov
Fidelity will send the feedback file to detamoov via SFTP. To create an SFTP account, make sure you are logged in with an administrator level account. Click on your initials in the top right corner and select the Admin Console link.

Within the Admin Console, select the Settings tab and click on the SFTP row. Once the SFTP area expands, click the Add button to add a new SFTP account.

The side sheet will be where you'll enter information on your new SFTP account. All fields are required. Here's some information on each field:
- Username: required, cannot contain spaces and must be unique across all SFTP accounts.
- Password: required and must adhere to the standard detamoov password requirements.
- Confirmation password: required and must match the password field exactly (case sensitive).
- Description: required and used to describe why you're creating this account.
Once you've entered all the information above, click Save and your account will be created.
Provide Fidelity with the SFTP credentials created above to allow them to send the feedback files for your client.
Host: sftp.prod.detamoov.com
Port: 22
Username: username created above
Password: password created above
Fidelity - Electronic Data Transmission Connectivity Form
You will need to complete the Fidelity Electronic Data Transmission (EDT) connectivity form to enable 360. For more information, please see the Fidelity - Electronic Data Transmission Connectivity Form article.
To configure your client, please add the Fidelity Deduction Feedback to ReadyPay moov to your account by following these steps.
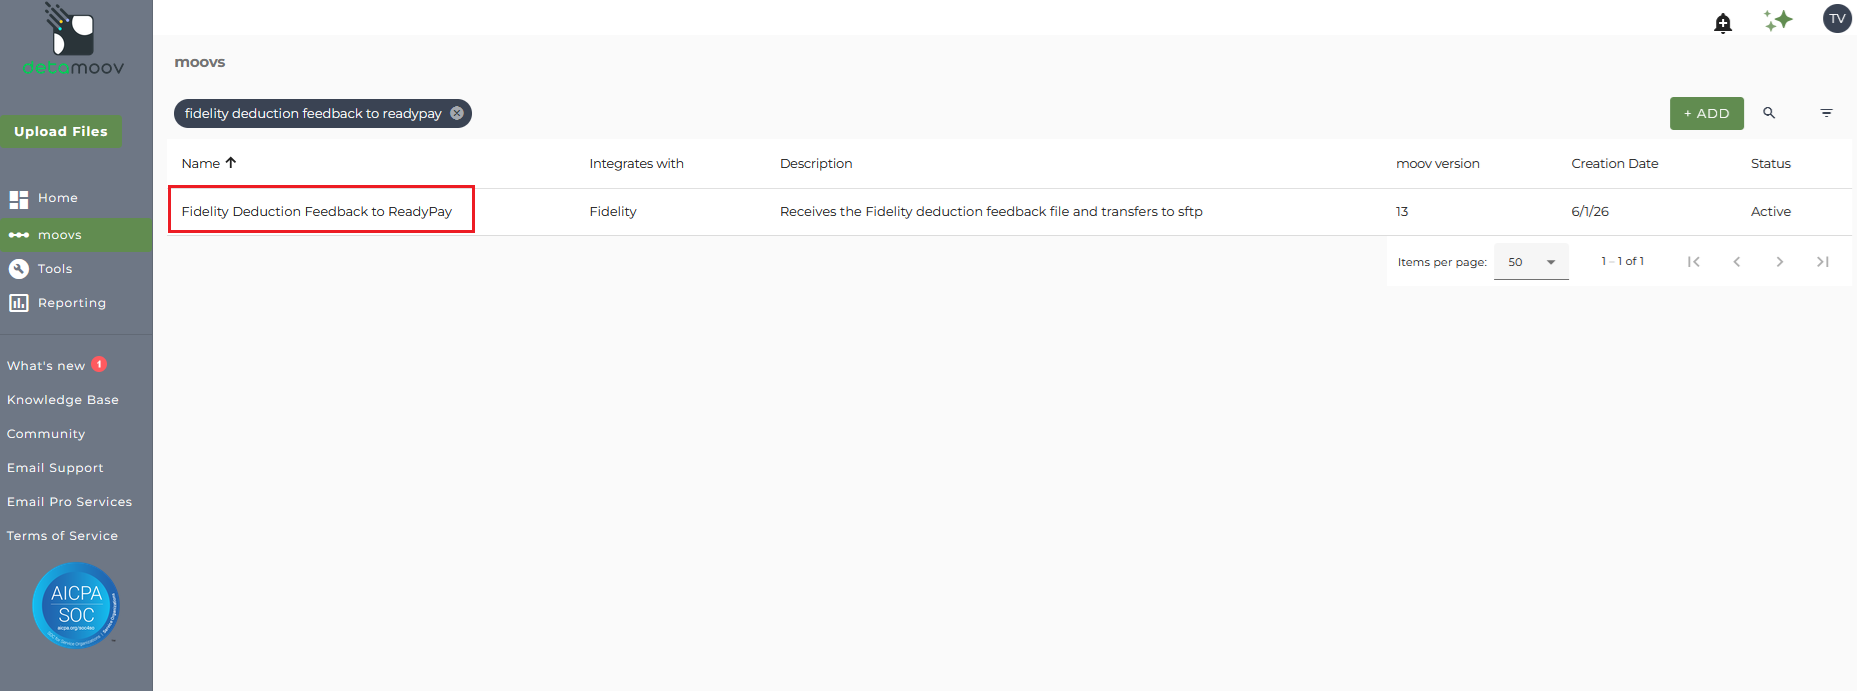
Once the Fidelity Deduction Feedback to ReadyPay moov has been added to your account, access the moovs section on the left side menu and click on the Fidelity Deduction Feedback to ReadyPay moov.
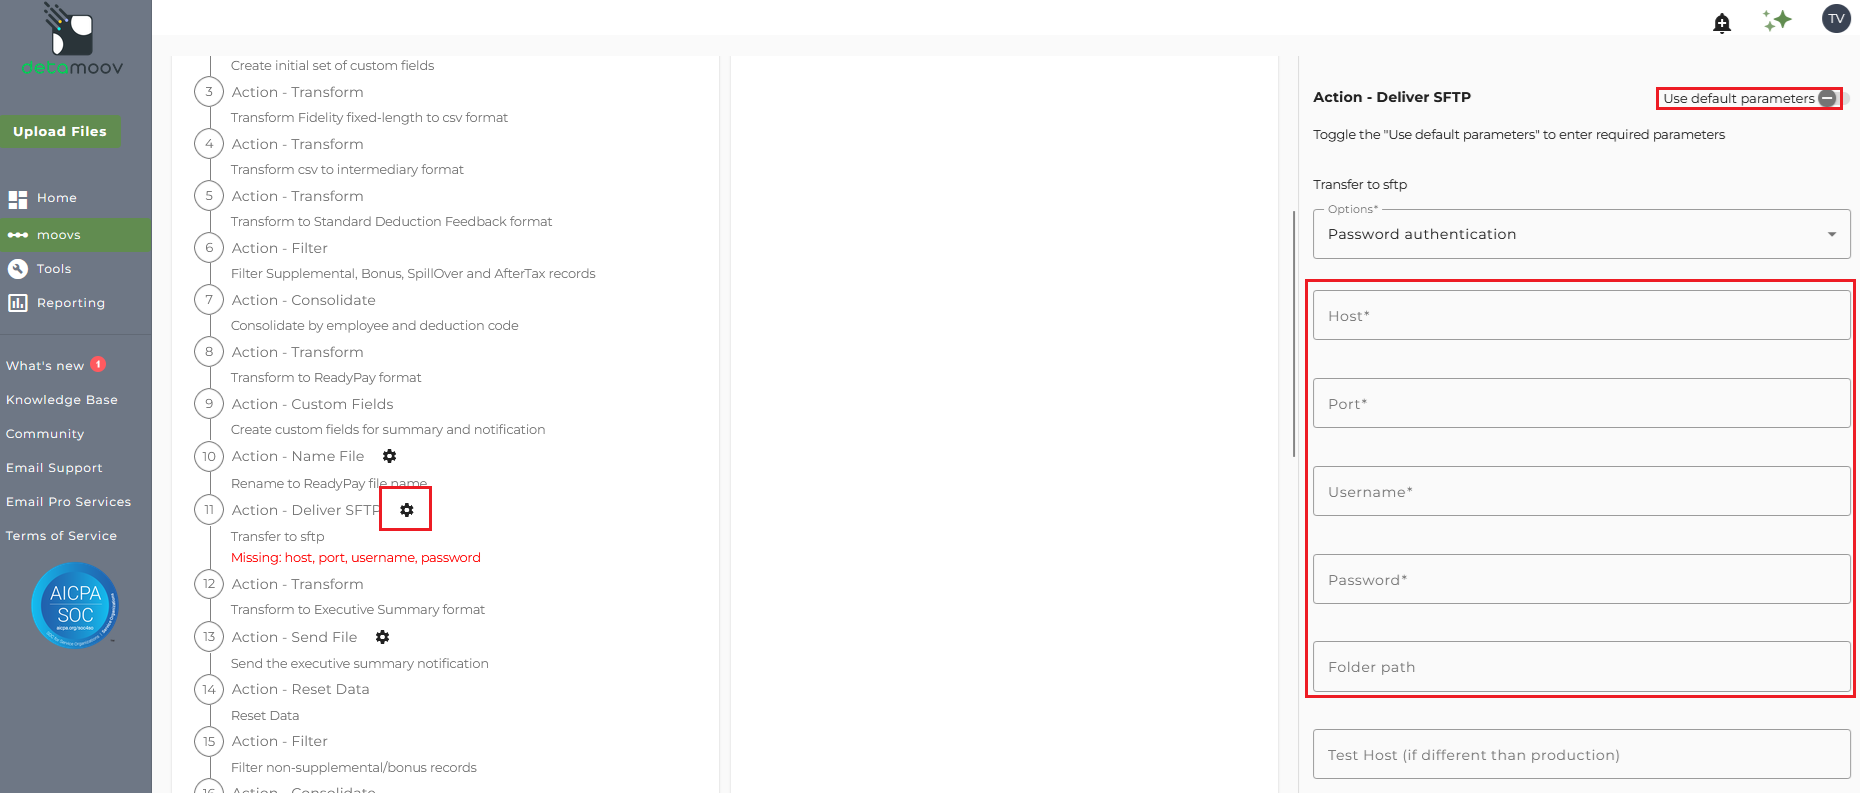
An override of the Deliver SFTP settings is required to provide your account-specific credentials for delivery of the ReadyPay format. To edit the Deliver SFTP step, click the cog icon under the Action - Deliver SFTP step and toggle the "Use default parameters" off. Then enter the following credentials and click Save Changes:
Host
Port
Username
Password
Folder Path (if different than the root directory)
Send File Settings - Executive Summary
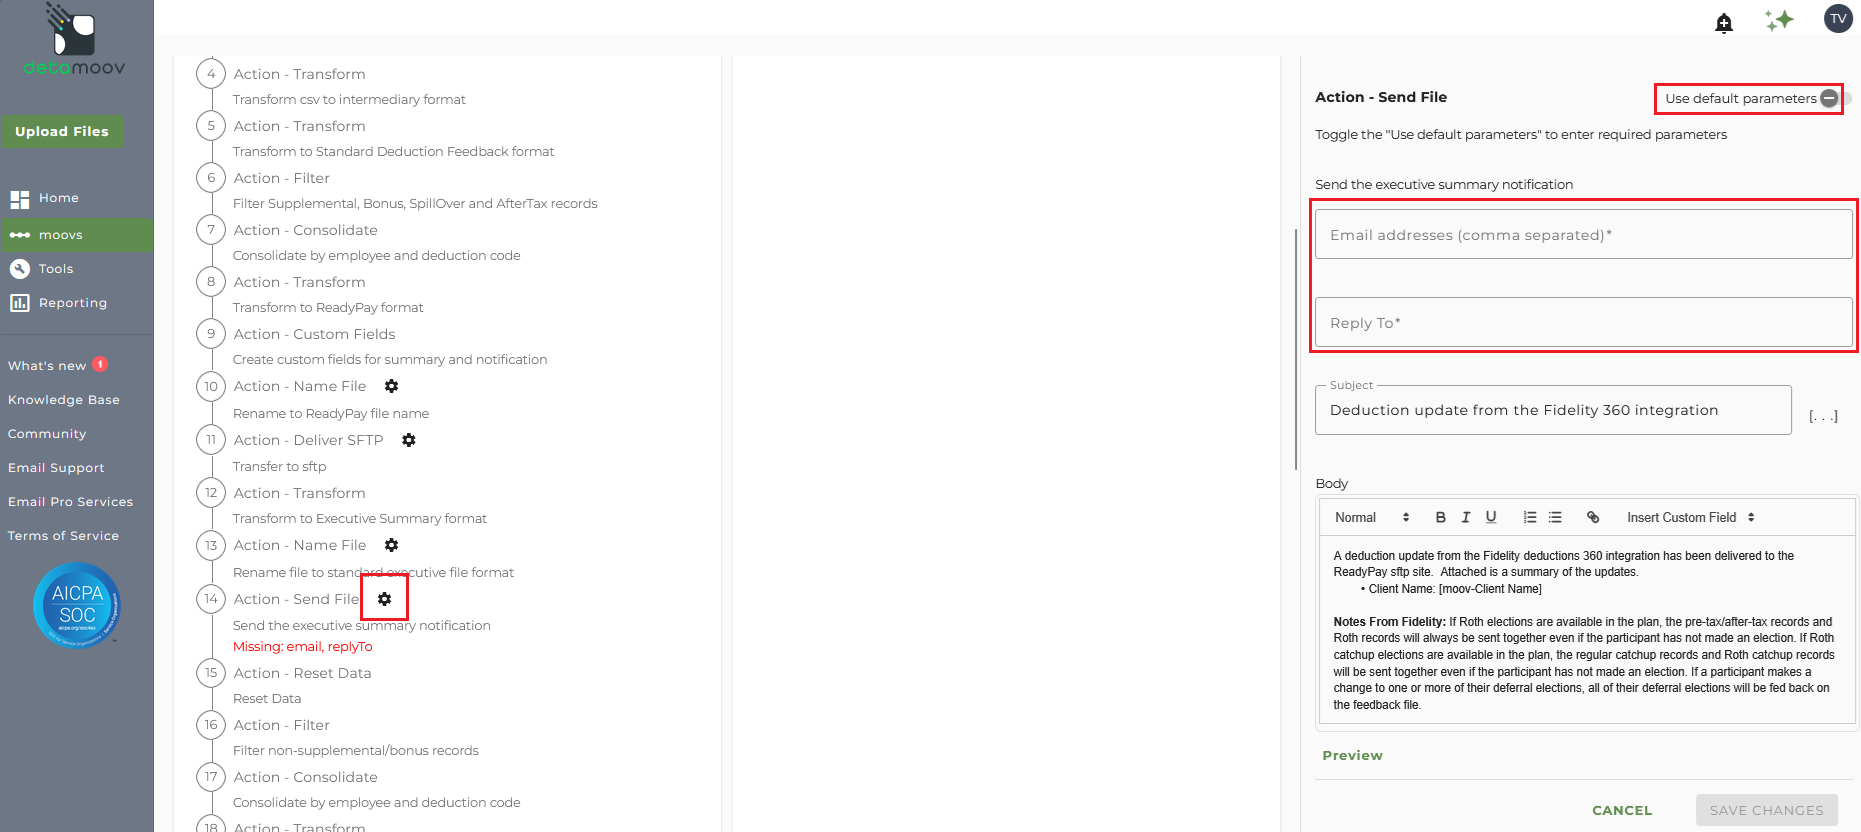
The Fidelity Deduction Feedback to ReadyPay moov provides a notification once the moov is complete with a summary of the retirement plan and loan changes that were made in PrismHR. The notification can be sent to any email address you wish and can also be configured to send to multiple email addresses.
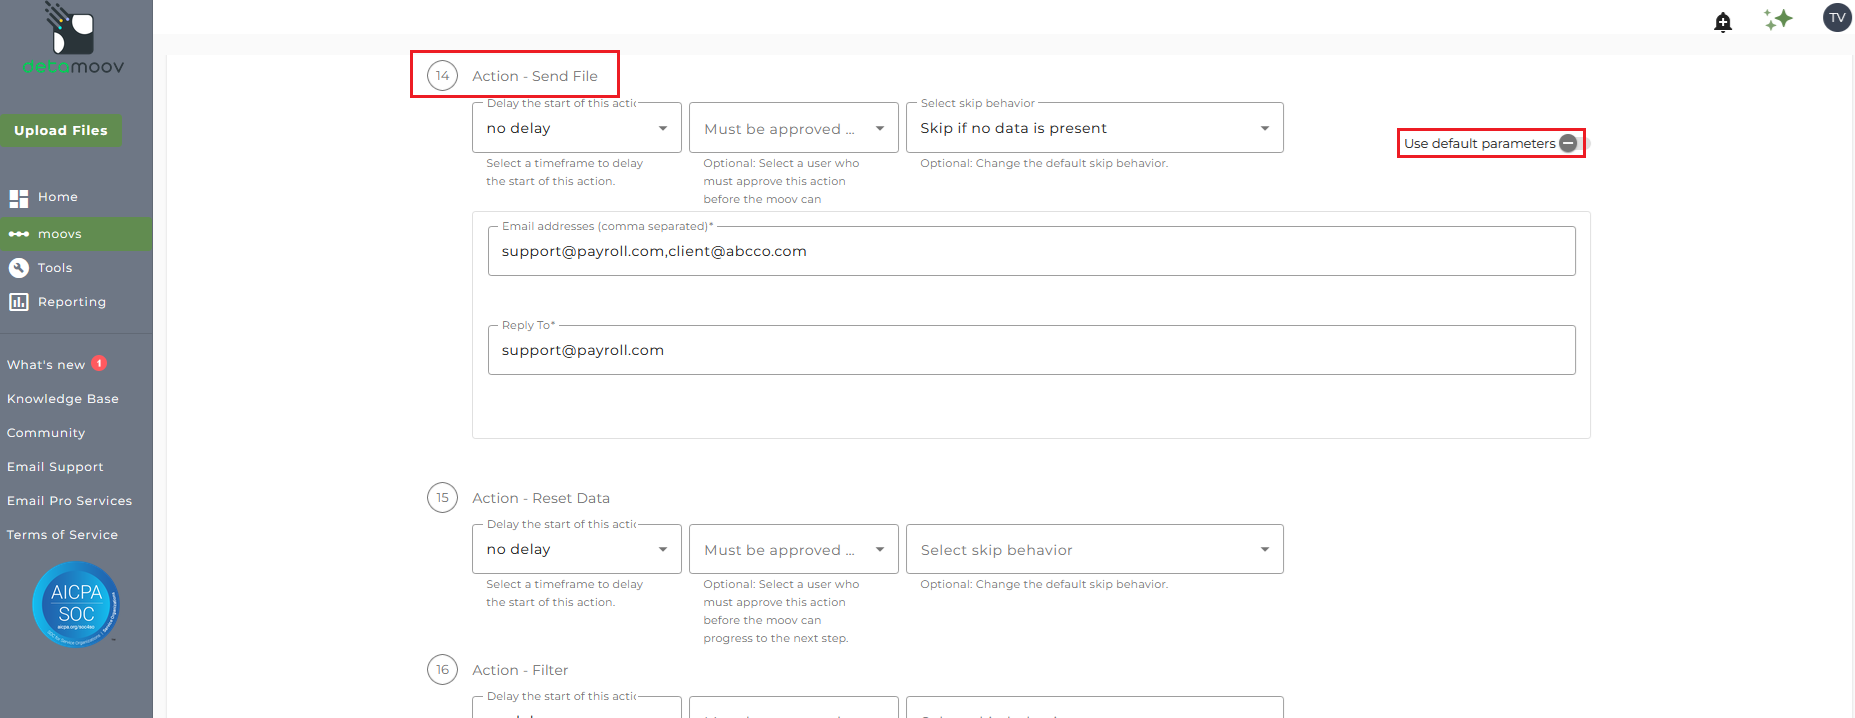
To edit the send file step, click on the cog icon under step 14: Action - Send File on the left. Then toggle the "Use default parameters" off and enter in the email addresses you would like to receive the notification. If you would like to enter multiple email addresses, separate them with a comma. A Reply to email is also required in the event that a recipient of the notification replies to the email.
Note: these settings apply to any client configuration you set up for this specific moov. You also have the ability to configure the send file step for each client configuration if you wish to add or remove email addresses per client.
To save your parameters click on the Save Changes button.
Send File Settings - Supplemental/Bonus records
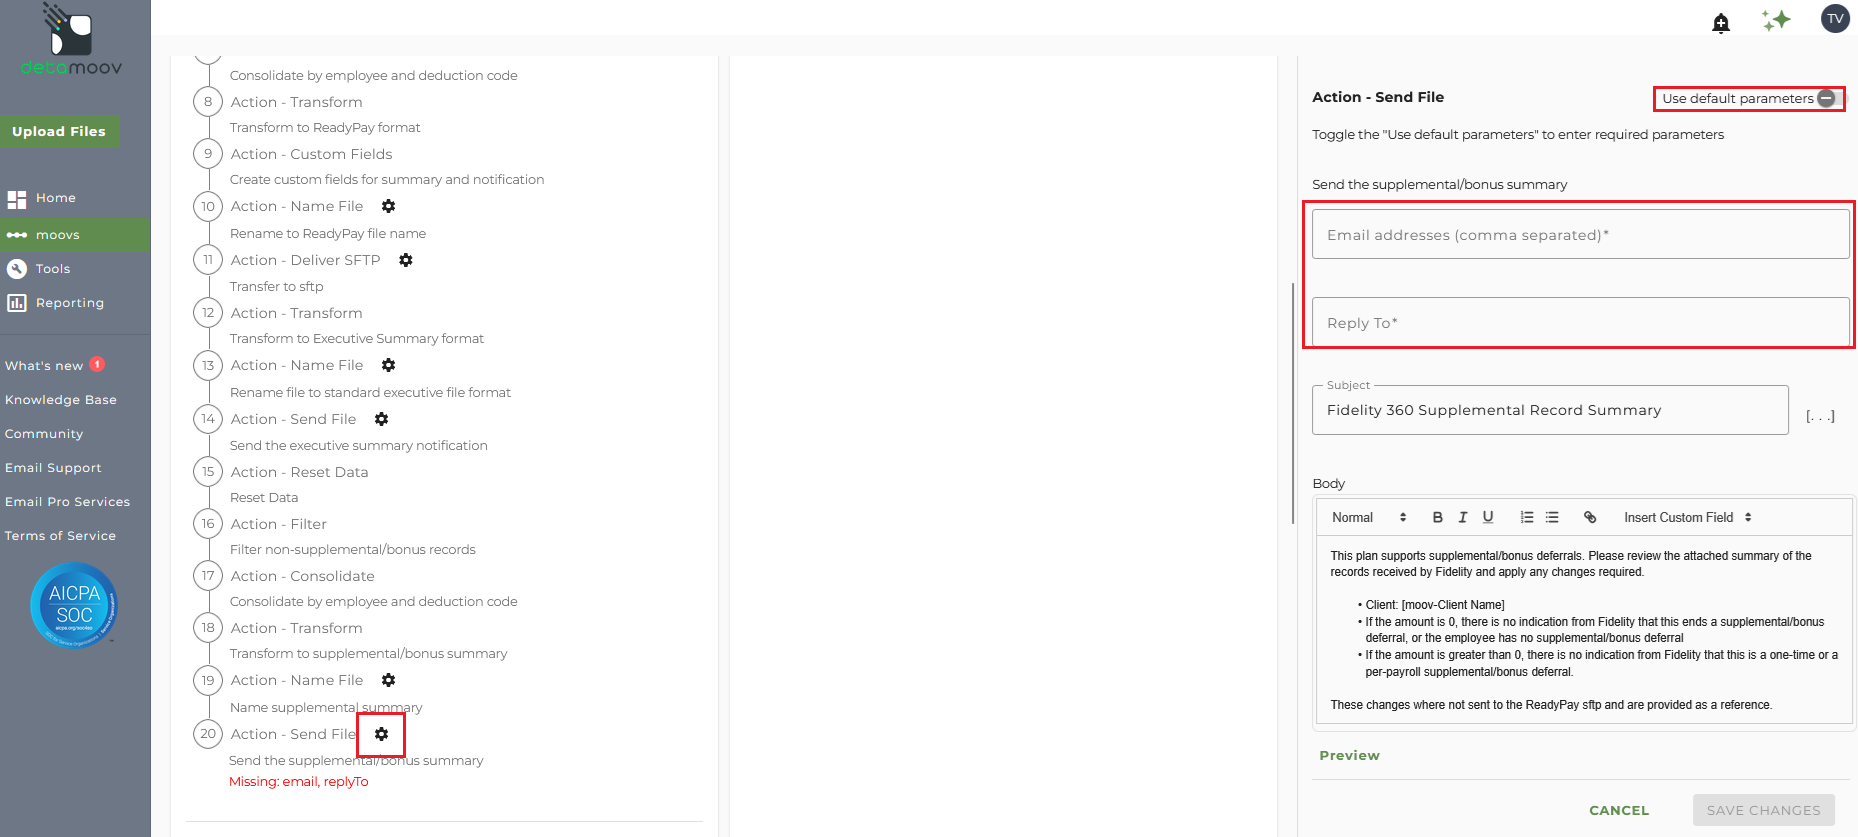
The Fidelity Deduction Feedback to PrismHR moov provides a notification for plans that have a Supplemental or Bonus option with a summary of these deductions sent by Fidelity. The notification can be sent to any email address you wish and can also be configured to send to multiple email addresses.
This step must be configured with at least one email address and a Reply to email even if the plan doesn't have a Supplemental or Bonus option.
To edit the send file step, click on the cog icon under step 20: Action - Send File on the left. Then toggle the "Use default parameters" off and enter in the email addresses you would like to receive the notification. If you would like to enter multiple email addresses, separate them with a comma. A Reply to email is also required in the event that a recipient of the notification replies to the email.
In the moov configuration section, click the Add button to add a new client to the moov.
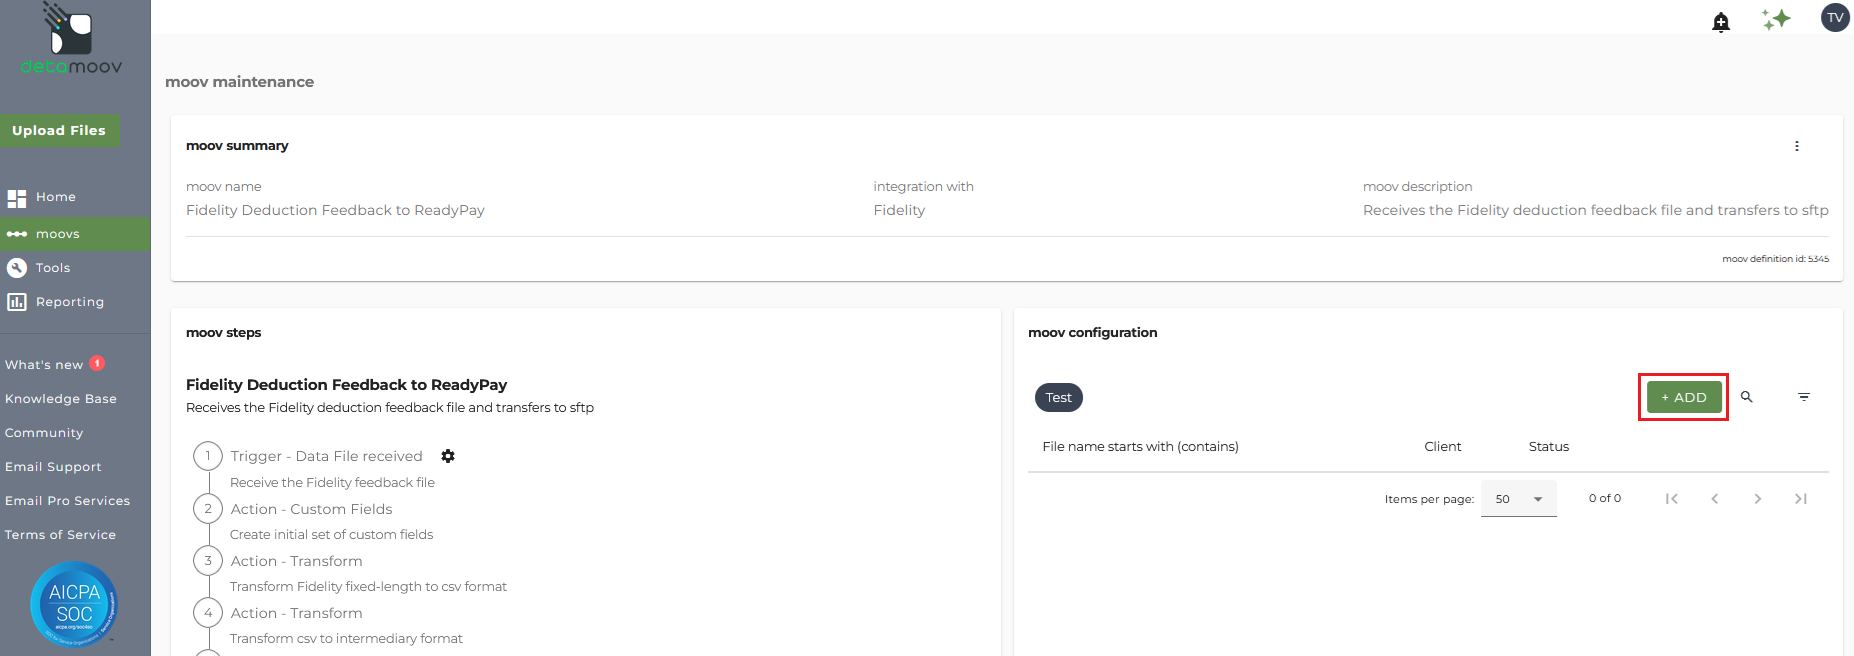
Client/Entity - either select an existing client or click the + sign to create a new client.
Status - Set to Active
Expected Frequency - the client's payroll frequency
File Name Starts With - odc[Fidelity provided value]
File Name Contains - def
Note: make sure that the File Name Starts with field matches as this can cause issues pulling the Fidelity feedback file and updating ReadyPay.
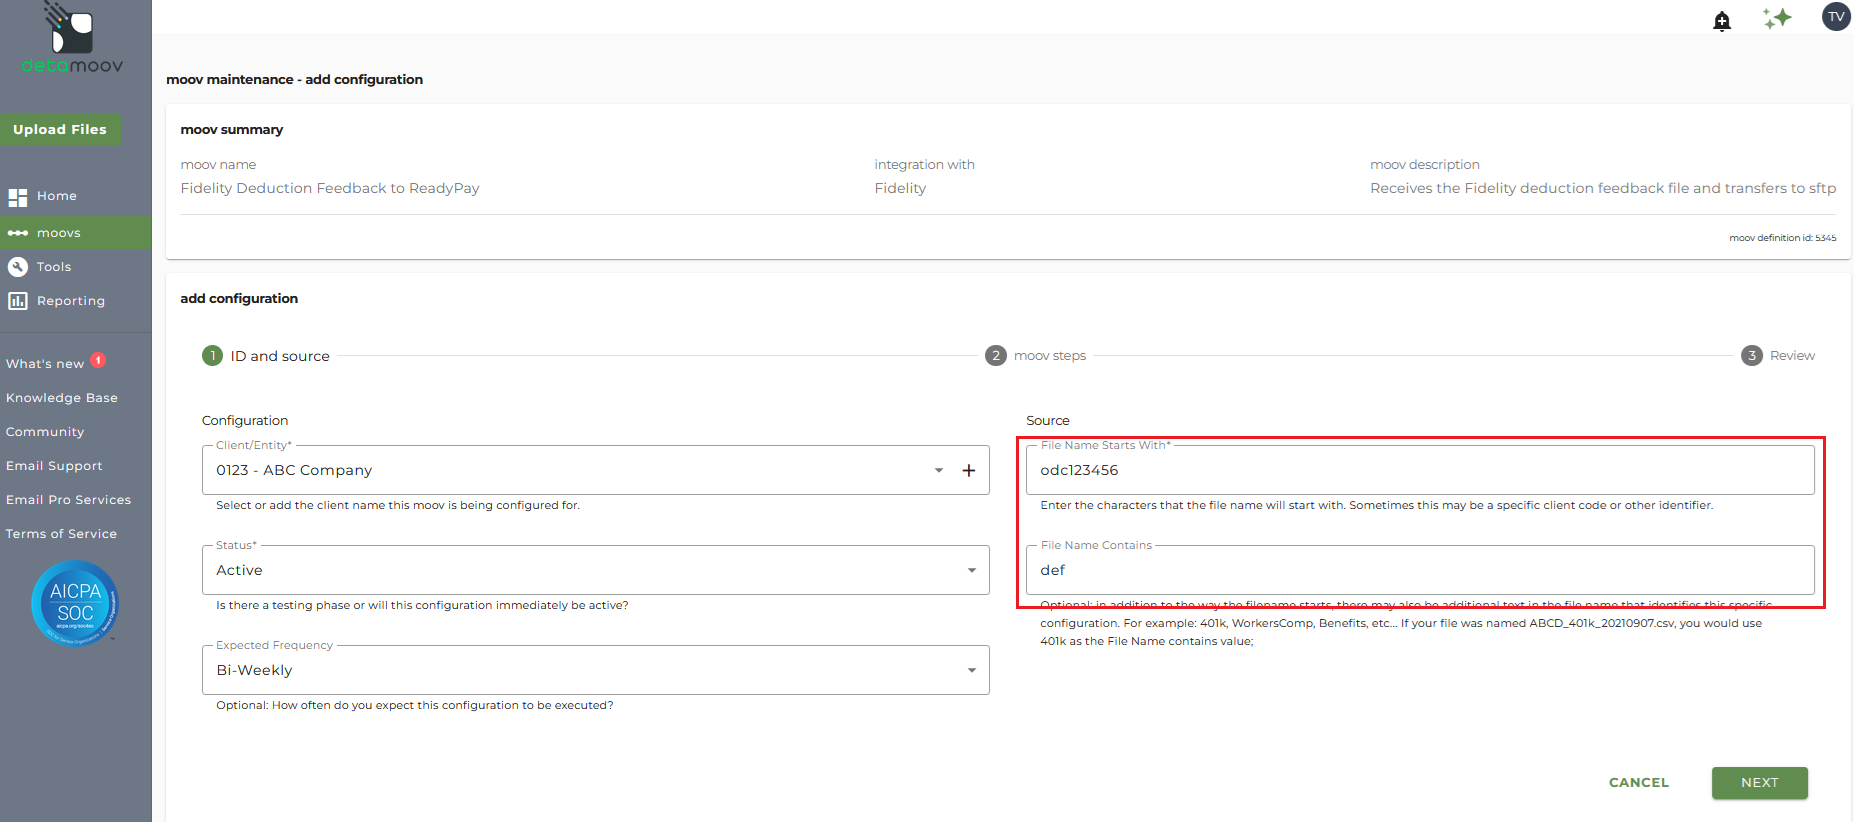
Click Next once you have completed the ID and source section.
Fidelity Deduction Feedback File Format
The Fidelity Deduction Feedback file is sent in a fixed-length format where each deduction is identified by a Record Identifier. Below is a table showing the Fidelity Record Identifiers and the corresponding deduction type:
| Record Identifier | Deduction Type | Notes |
| 01 | Participant Identification | |
| 02 | PreTax/AfterTax Percent | Supported |
| 02 | PreTax/AfterTax Percent Supplemental |
Not supported in detamoov Sent in a summary |
| 02R | Roth Percent | Supported |
| 02R | Roth Percent Supplemental |
Not supported in detamoov Sent in a summary |
| 04 | PreTax/AfterTax Dollar Amount | Supported |
| 04 | PreTax/AfterTax Dollar Amount Supplemental |
Not supported in detamoov Sent in a summary |
| 04R | Roth Dollar Amount | Supported |
| 04R | Roth Dollar Amount Supplemental |
Not supported in detamoov Sent in a summary |
| 05 | Status Code | |
| 06 | Spillover Percent | Not supported in detamoov |
| 06C | Catch Up Percent | Supported |
| 06R | Roth Catch Up Percent | Supported |
| 07 | Spillover | Not supported in detamoov |
| 07C | Catch Up Dollar Amount | Supported |
| 07R | Roth Catch Up Dollar Amount | Supported |
| TT1 | Trailer Record |
Certain records are automatically sent for a participant when your client's plan has an available election, even if the participant has not made an election. For example:
If Roth elections are available in the plan, the Pre-Tax/After-Tax records and Roth records will always be sent together.
If Roth Catch Up elections are available in the plan, the regular Catch Up records and Roth Catch Up records will always be sent together.
If a participant changes one or more of their deferral elections, all of their deferral elections will be fed back on the feedback file.
The Pre-Tax and After-Tax deductions exist on the same record in the Fidelity Deduction Feedback file. detamoov needs to create both of these deductions from the record as we have no way of knowing if your client's plan has one or the other, or both. So we create a filter to remove the After-Tax record by default and allow you to override the default settings.
Remove the After-Tax filter
If your client's plan has an After-Tax contribution then you will need to remove the default filter rule to allow detamoov to send the appropriate deduction.
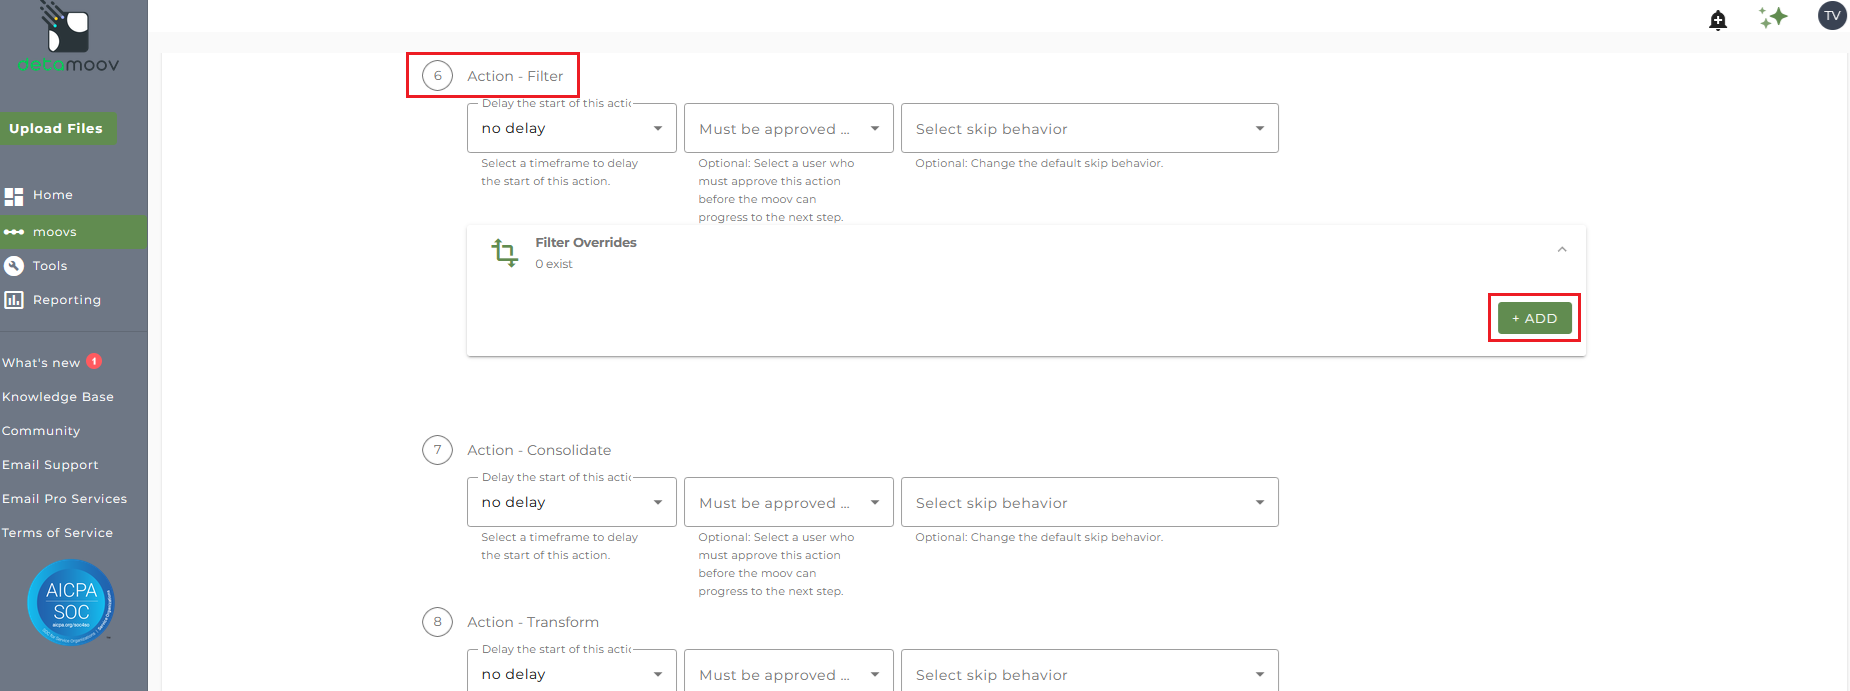
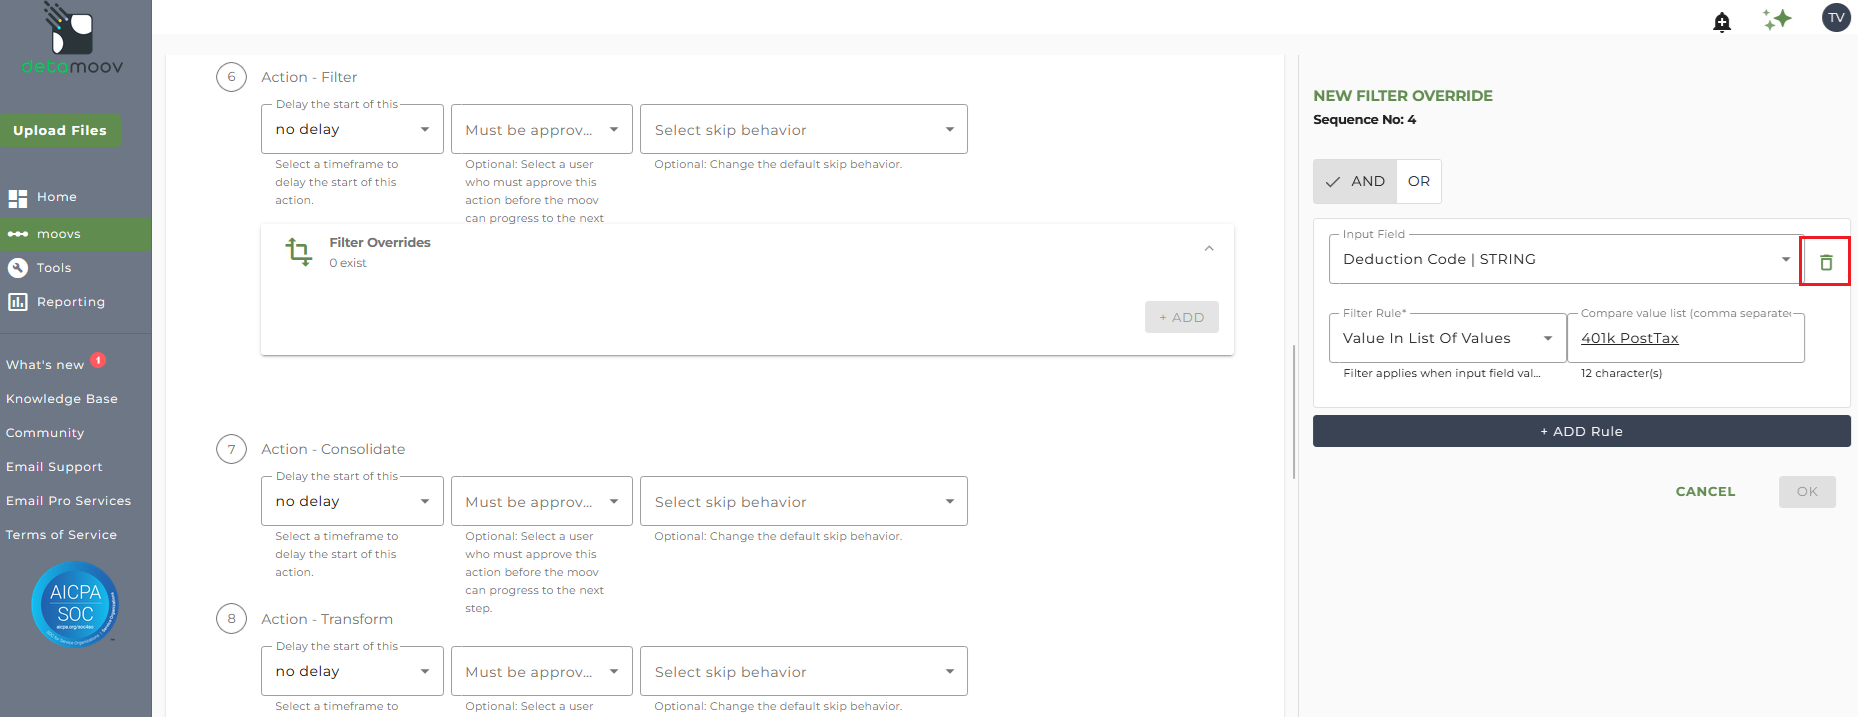
To create a filter override locate step 6: Action - Filter, expand the Filter Overrides section and click ADD.
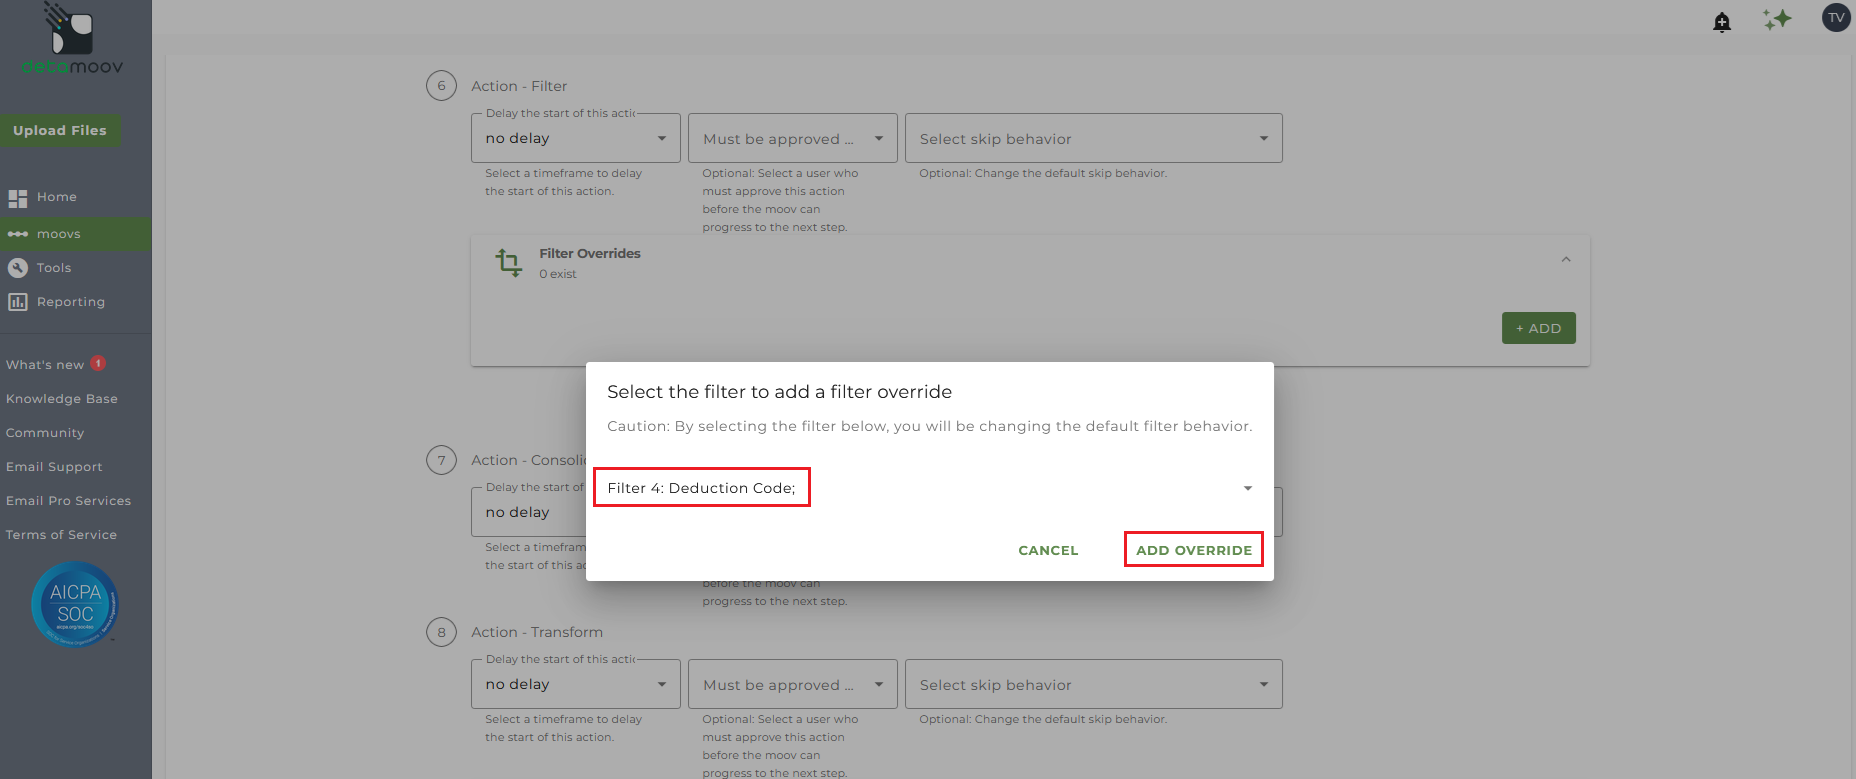
Select Filter 4: Deduction Code and click Add Override.
On the right-hand side, hover over the Deduction Code | STRING field and click the trash can icon and click OK.
Add a Pre-Tax filter
If your client's plan has an After-Tax contribution, but doesn't have a Pre-Tax contribution, then you will need to change the default filter rule to allow detamoov to send the appropriate deduction.
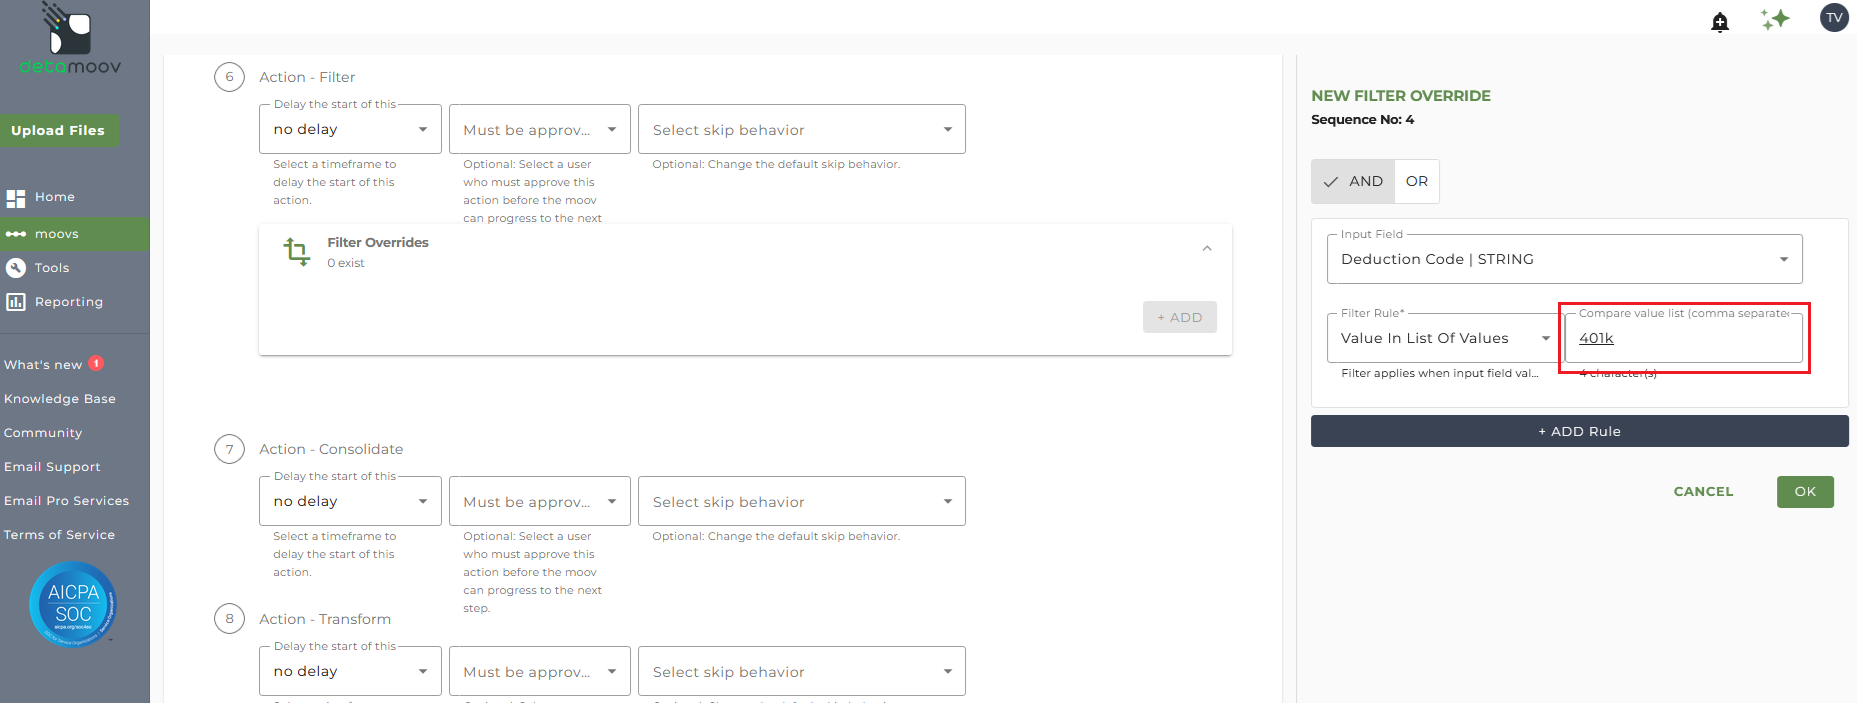
To create a filter override locate step 6: Action - Filter, expand the Filter Overrides section and click ADD.
Select Filter 4: Deduction Code and click Add Override.
On the right-hand side, replace the text "401k PostTax" with the text "401k" and click OK.
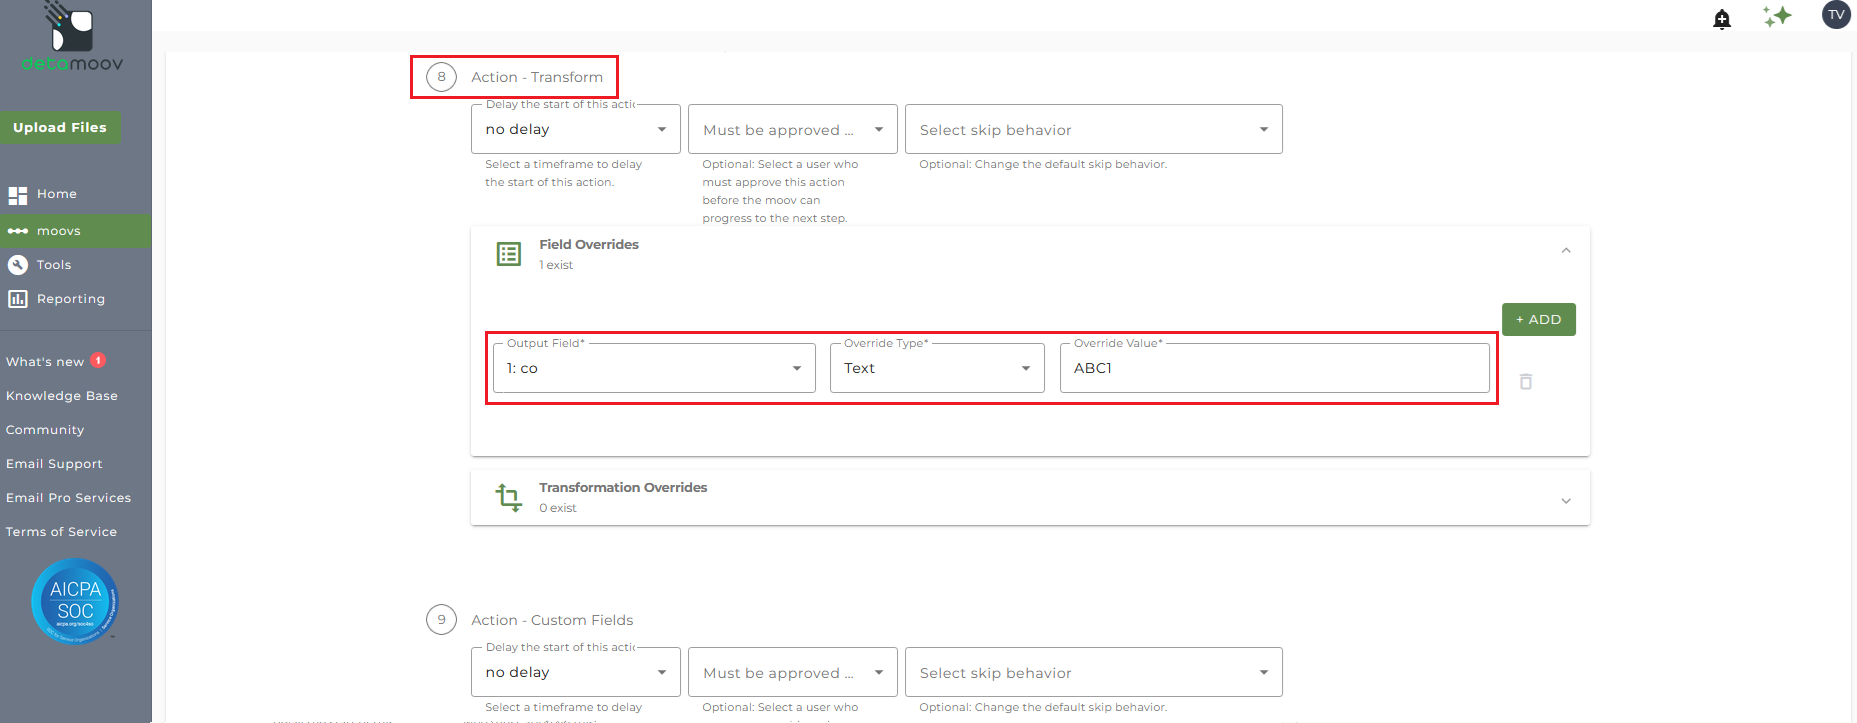
ReadyPay requires the company value be included in the 'co' field for each employee.
To add a Field Override, locate step 8: Action - Transform and expand the Field Overrides panel.
NOTE: There are five separate Transform steps on the Fidelity Deduction Feedback to ReadyPay moov. Make sure you are creating the field override on step 8: Action - Transform.
Then click the ADD button, select field 1: co, and enter the value in the Override value field.
If your ReadyPay dcode values for your client are different than the default values listed below, you will need to create a transformation override to update the mappings.
Default ReadyPay dcode values:
401K
401KC
4ROTH
4ROTC
401KLOAN
For example, if your client's ReadyPay 401k code is "PreTax" instead of "401K", you will need to override the default mappings to change to this value.
To provide a transformation override, locate step 8: Action - Transform, expand the Transformation Overrides panel and click ADD.
NOTE: There are five separate Transform steps on the Fidelity Deduction Feedback to ReadyPay moov. Make sure you are creating the transformation override on step 8: Action - Transform.
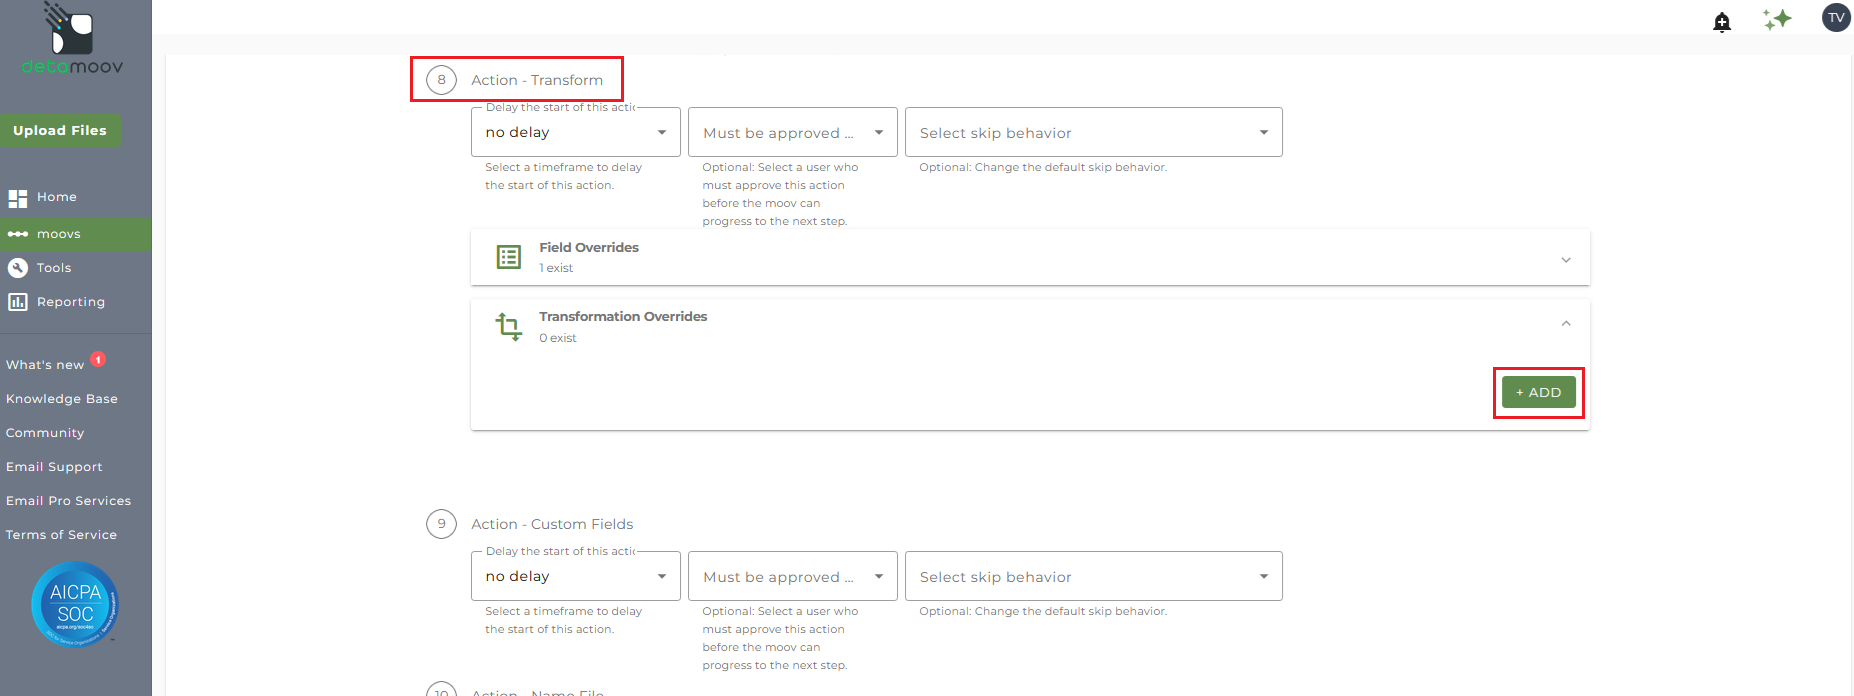
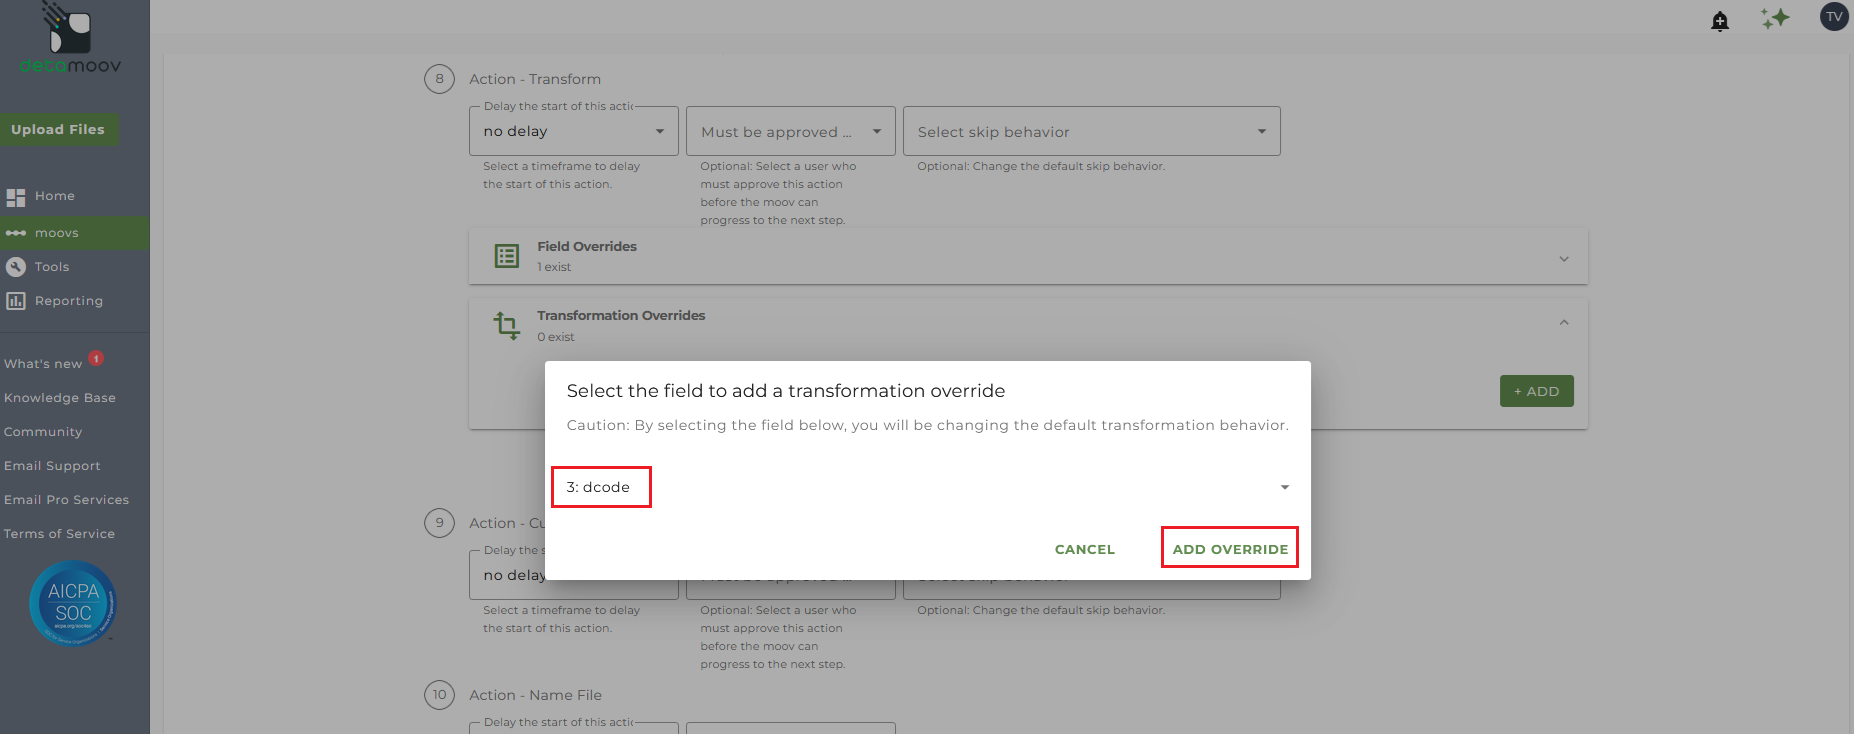
Then select field 3: dcode and click ADD OVERRIDE.
On the side panel that appears, in the Replacement Groups field, replace the right side of 401k|401K with your client's deduction code. From our example, we would enter "PreTax" to the right of the pipe character.
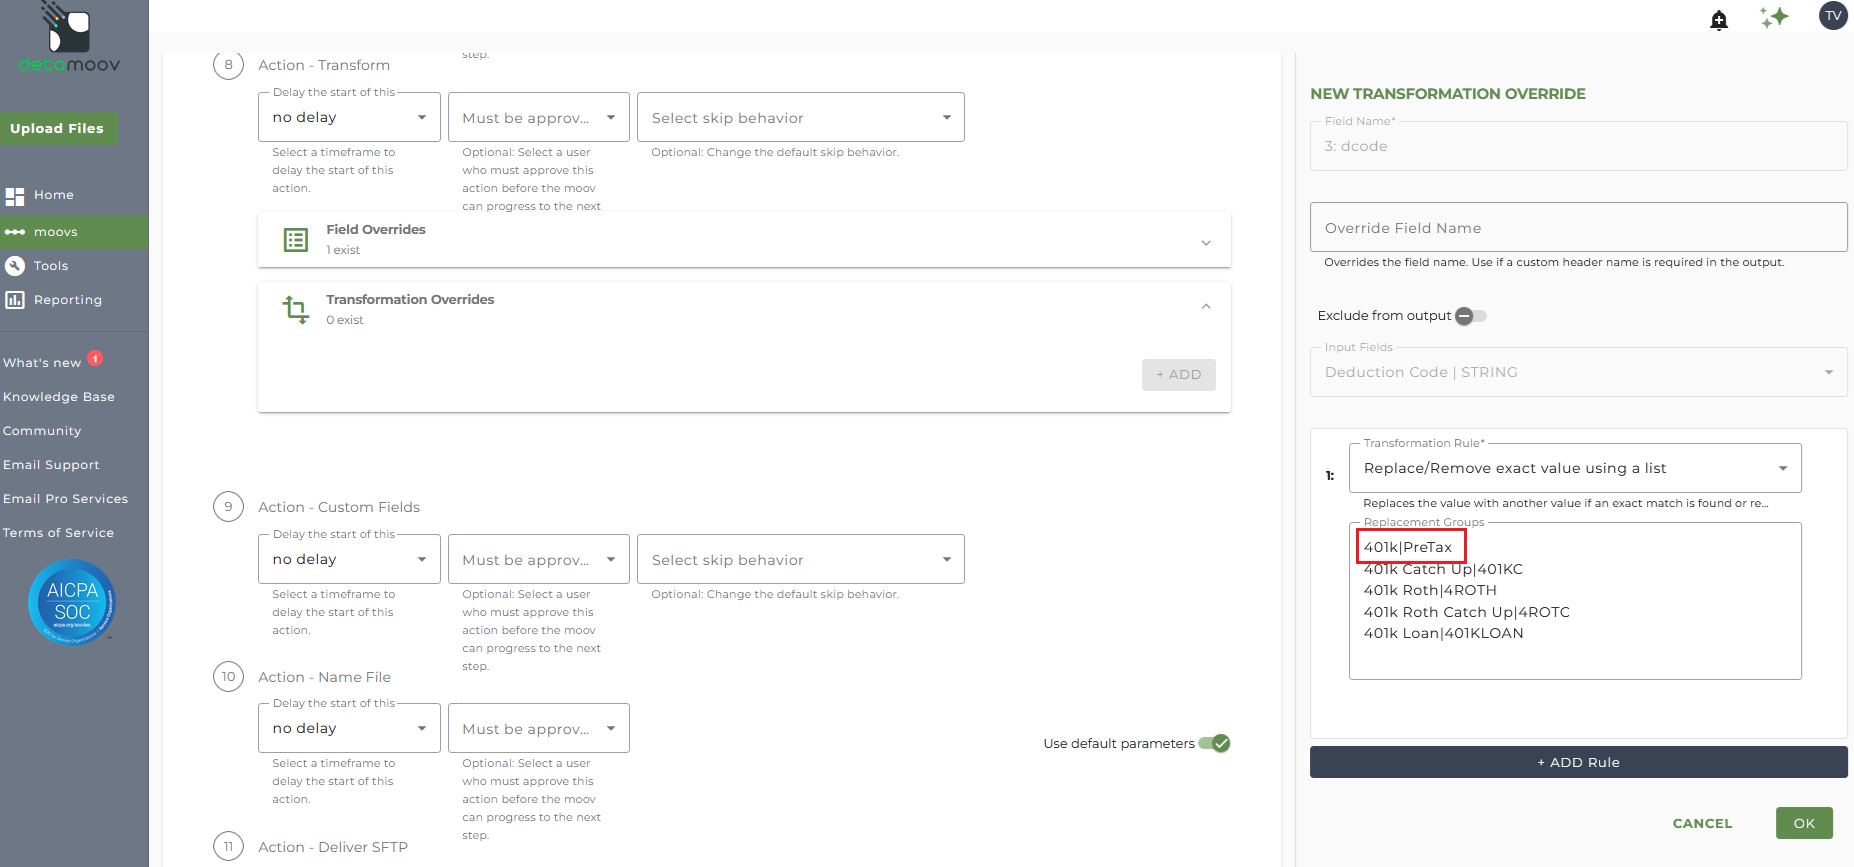
Add any additional overrides for your client's dcodes and click OK.
Send File Step Override - Executive Summary
At the beginning of this article you configured the send file step for the moov to send a notification once the moov had completed. You also have the ability to configure the send file step for each client configuration if you wish to add or remove email addresses per client.
To override the send file step, locate step 14: Action - Send File and toggle the "Use default parameters" off and enter/remove email addresses from Email Address and Reply To fields. If you would like to enter multiple email addresses, separate them with a comma.
To complete the configuration for your client, click the Next button at the bottom of the page and then the Save button on the moov summary page.
Filter Override - Supplemental or Bonus
Remove the After-Tax Supplemental or Bonus filter
The Pre-Tax and After-Tax supplemental or bonus deductions exist on the same record in the Fidelity Deduction Feedback file. detamoov needs to create both of these deductions from the record as we have no way of knowing if your client's plan has one or the other, or both. So we create a filter to remove the After-Tax Supplemental record by default and allow you to override the default settings.
If your client's plan has an After-Tax contribution with a supplemental or bonus option, you will need to remove the default filter rule to allow detamoov to send the appropriate deduction.
To create a filter override locate step 16: Action - Filter, expand the Filter Overrides section and click ADD.
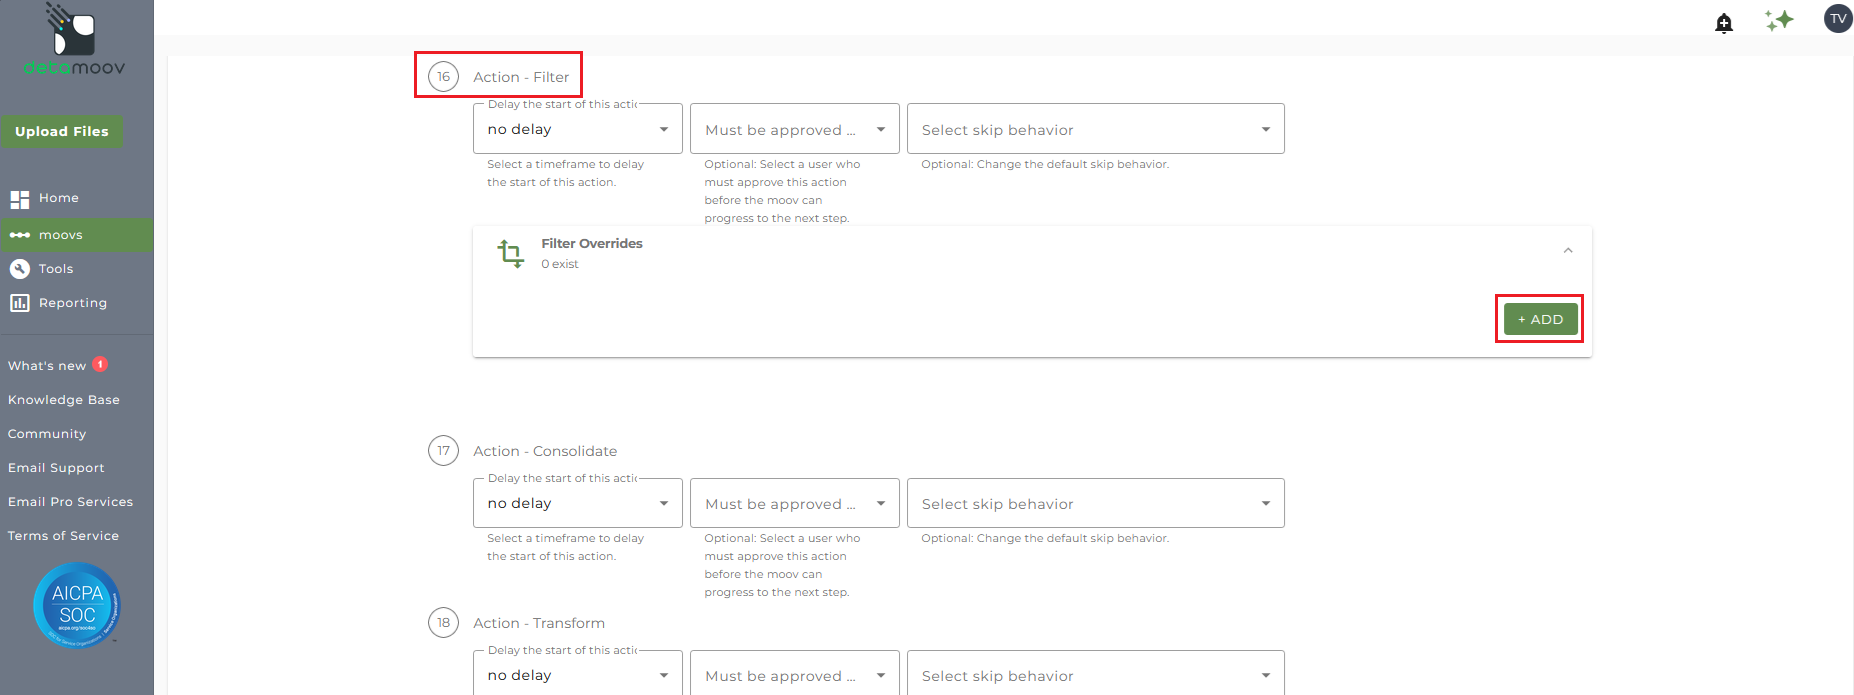
Select Filter 1: Deduction Code and click Add Override.
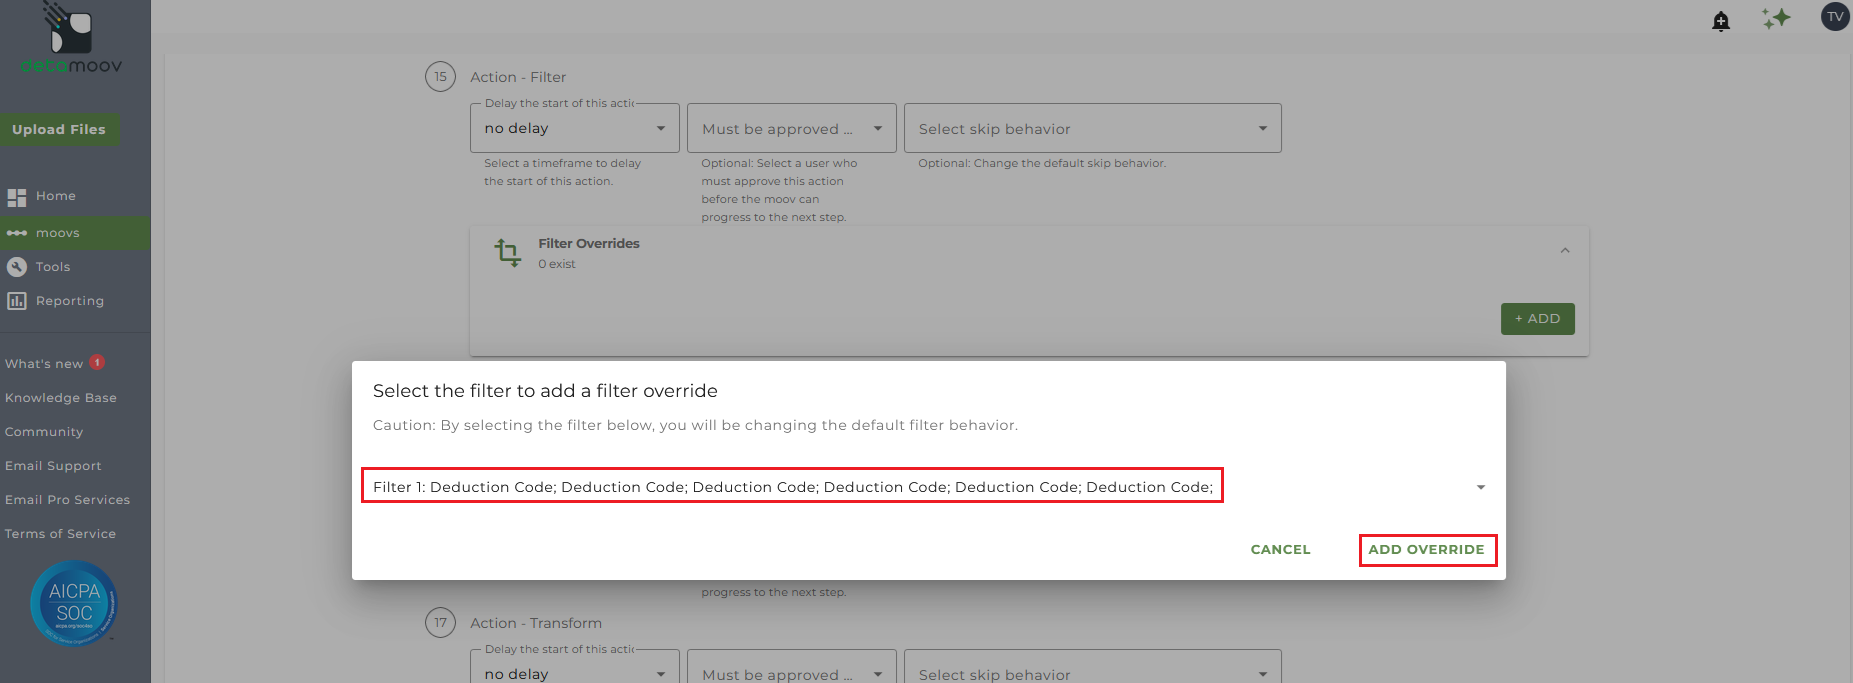
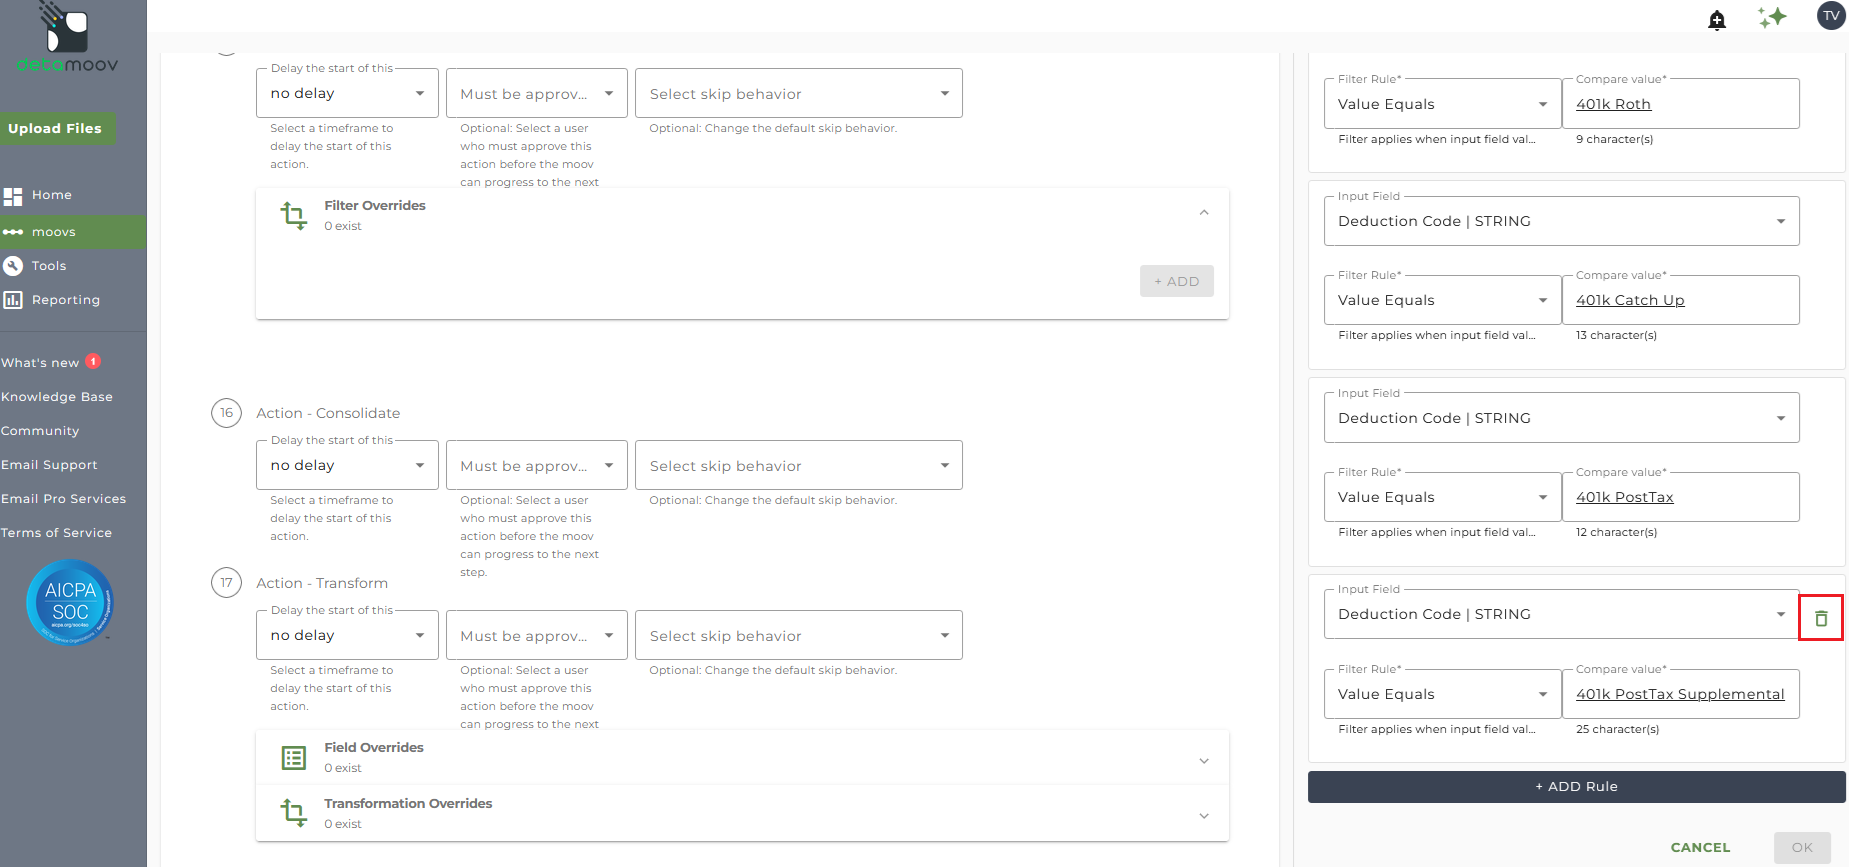
On the right-hand side, scroll to the bottom of the Filter Rules. Hover over the Deduction Code | STRING field for "401k PostTax Supplemental" and click the trash can icon and click OK.
Add a Pre-Tax Supplemental or Bonus filter
If your client's plan has an After-Tax contribution with a supplemental or bonus option, but doesn't have a Pre-Tax contribution with a supplemental or bonus option, then you will need to change the default filter rule to allow detamoov to send the appropriate deduction.
To create a filter override locate step 16: Action - Filter, expand the Filter Overrides section and click ADD.
Select Filter 1: Deduction Code and click Add Override.
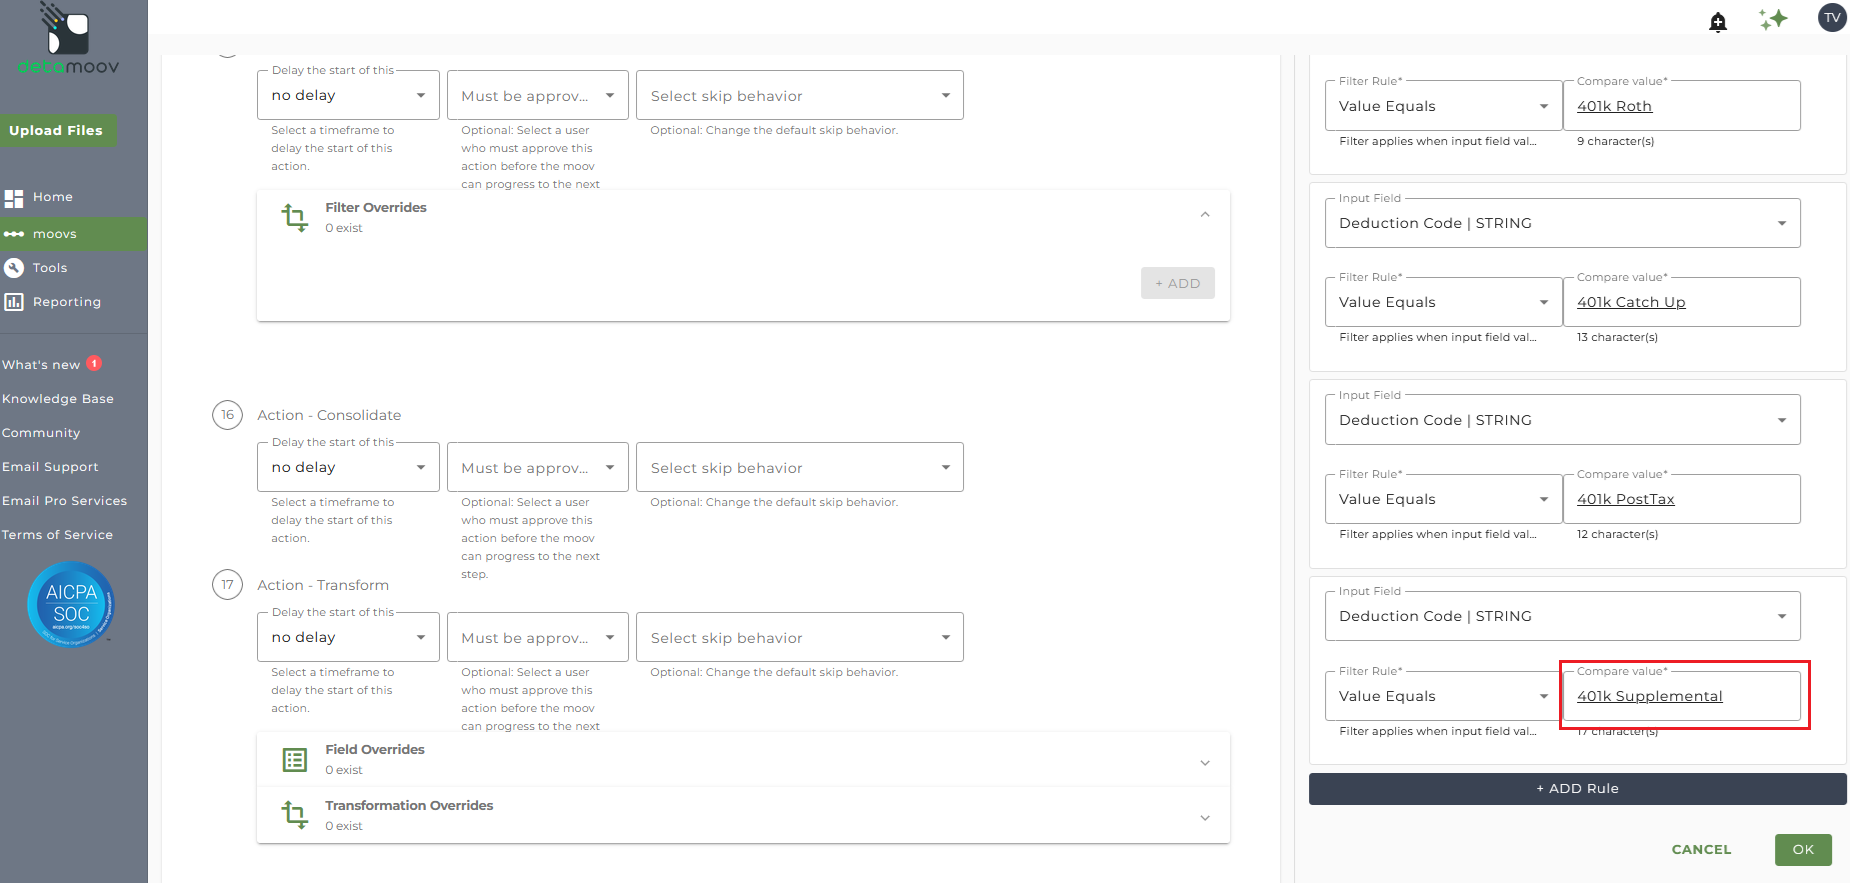
On the right-hand side, replace the text "401k PostTax Supplemental" with the text "401k Supplemental" and click OK.
Send File Step Override - Supplemental/Bonus records
At the beginning of this article you configured the send file step for the moov to send a summary of supplemental/bonus records received from Fidelity. You also have the ability to configure the send file step for each client configuration if you wish to add or remove email addresses per client.
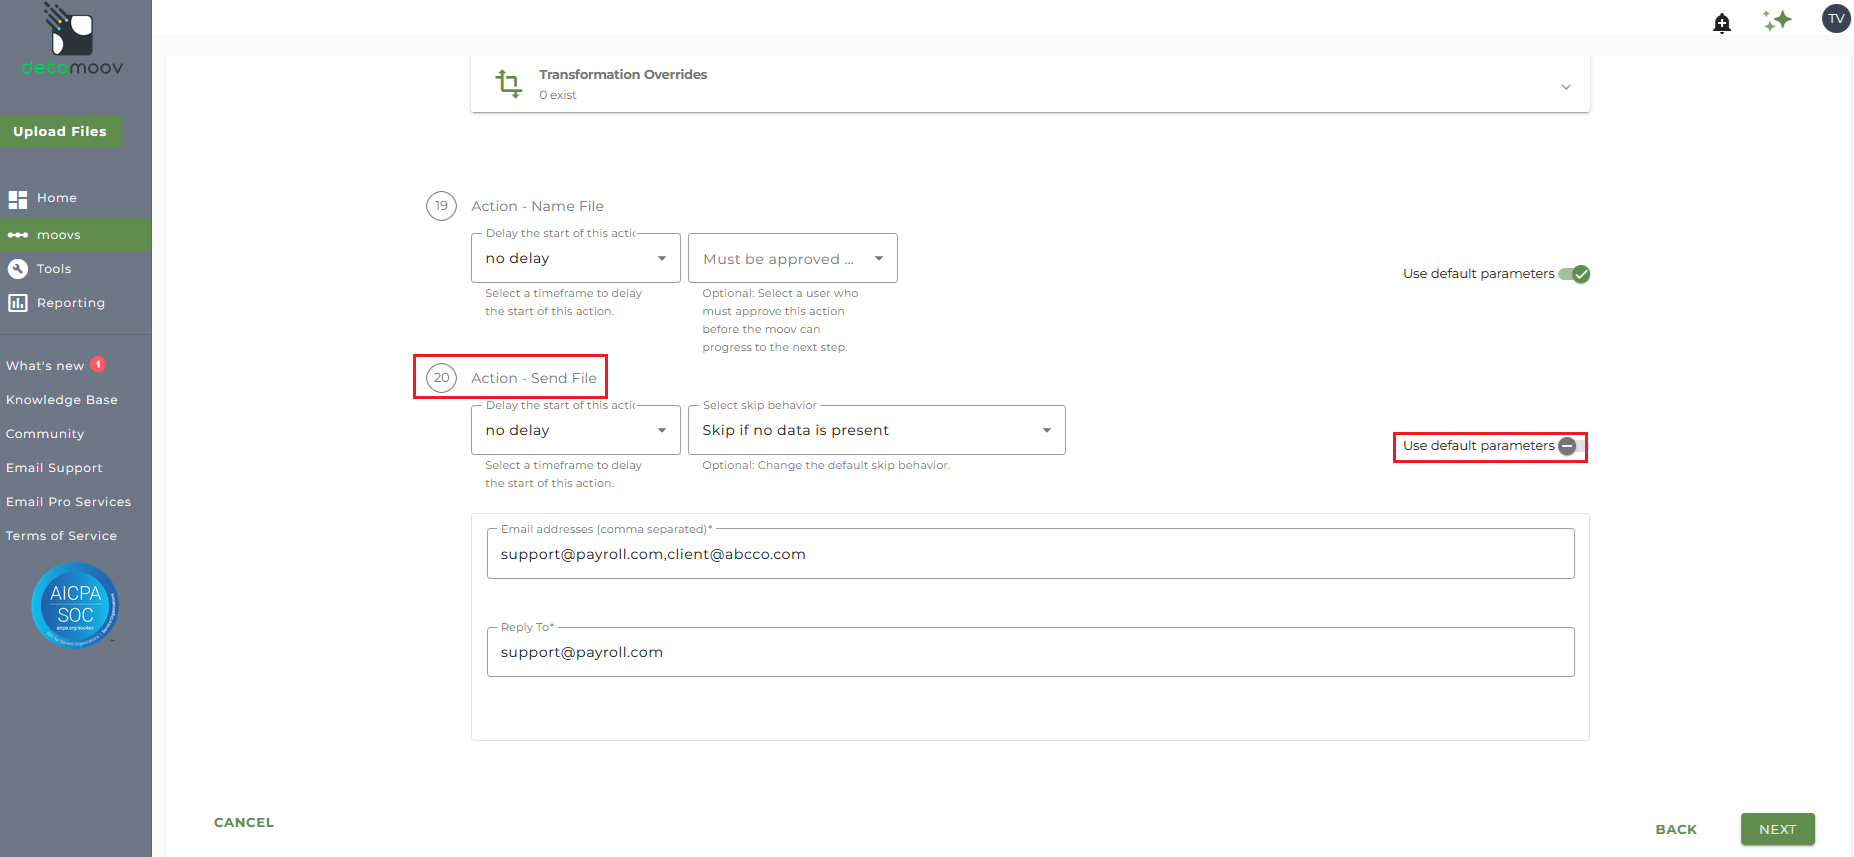
To override the send file step, locate step 20: Action - Send File and toggle the "Use default parameters" off and enter/remove email addresses from Email Address and Reply To fields. If you would like to enter multiple email addresses, separate them with a comma.
To complete the configuration for your client, click the Next button at the bottom of the page and then the Save button on the moov summary page.
Fidelity sends the updates to loans in a separate file and requires that you configure the Fidelity Loan Feedback to ReadyPay moov. If your client's plan has loans, please see the How to Configure the Fidelity Loan Feedback to ReadyPay moov article.

