
This article describes the steps available when creating a moov definition. These step are in the order they are shown in the Step dropdown menu. The step order in which you need to build your moov definition may vary.
The trigger step is the first step and defines either the type of data received on a moov definition, or how detamoov will receive the data. Note that the selection of a specific trigger step will determine the available subsequent steps.
Data Trigger
Identifies the type of data file received based on a csv or fixed length File Definition. See the How to create a new file definition article for more information.

File definition - the defined data that will be received on the moov.
Collision detection - a collision is triggered when two or more executions of the same moov configuration are invoked. For more information, see the What's a collision? article.
Delay Execution Minutes - allows data tied to the same moov configuration to be merged into a single file. For more information, see How to set a delay on the Data File trigger step of a moov configuration article.
Document Trigger
Identifies a document file received. This is a document which cannot be transformed. This trigger is used primarily to receive a document and send the document unchanged to a list of recipients.

QBO IIF Trigger
Identifies a file in QBO IIF in either comma or tab delimited format. detamoov will automatically transform IIF files into our Standard GL format required to import to QuickBooks Online. Select the 'Standard GL' File Definition when creating a QBO IIF Trigger moov.

File definition - the defined data that will be received on the moov.
IIF Field Delimiter - the delimiter used in the IIF file
Collision detection - a collision is triggered when two or more executions of the same moov configuration are invoked. For more information, see the What's a collision? article.
Sftp Pull Data Trigger
On a schedule basis, this trigger step pulls files from an external SFTP site for processing. This trigger step also identifies the type of data file received based on a csv or fixed length File Definition. See the How to create a new file definition article for more information.

Options - type of authentication the sftp server requires to connect.
File definition - the defined data that will be received on the moov.
Collision detection - a collision is triggered when two or more executions of the same moov configuration are invoked. For more information, see the What's a collision? article.
Delay Execution Minutes - allows data tied to the same moov configuration to be merged into a single file. For more information, see How to set a delay on the Data File trigger step of a moov configuration article.
Sftp Credentials - the credentials the sftp server requires to connect.
This step creates header and/or footer rows and adds them to the output of the preceding step.
To add a header/footer row, click on the 'Add Row' button in the Header Rows or Footer Rows section.

Then click on the 'Row index:1' to expand the row. The type and delimiter fields will default to the type and delimiter of the File Definition selected on the trigger step. This can be changed if your output requires a different header/footer type and/or delimiter.

To add fields to your header or footer row, click the 'Add Component' button.

A row component consists of a Name and a Row Component Type. The Row Component Type will depend on the type of data you wish to include in the header/footer row. Below are the available options for a Row Component Type.
DateTime - provides the DateTime of when the moov is executed in a pattern of your choosing.
Unique ID - creates a GUID (globally unique identifier)
Text - alphanumeric value
Variable - select an account specific value. Variable can be created in your detamoov account under Admin Console/Settings.
Custom Field - Predefined custom fields created for this moov definition. Custom Fields must be created before the Add Header/Footer Rows step to be available for selection. See Configure Custom Fields for more information.
This step allows you to allocate data from the input file according to predefined allocation definitions. An allocation definition is required to allocate data. Fore more information, see the How to create a new allocation definition article.
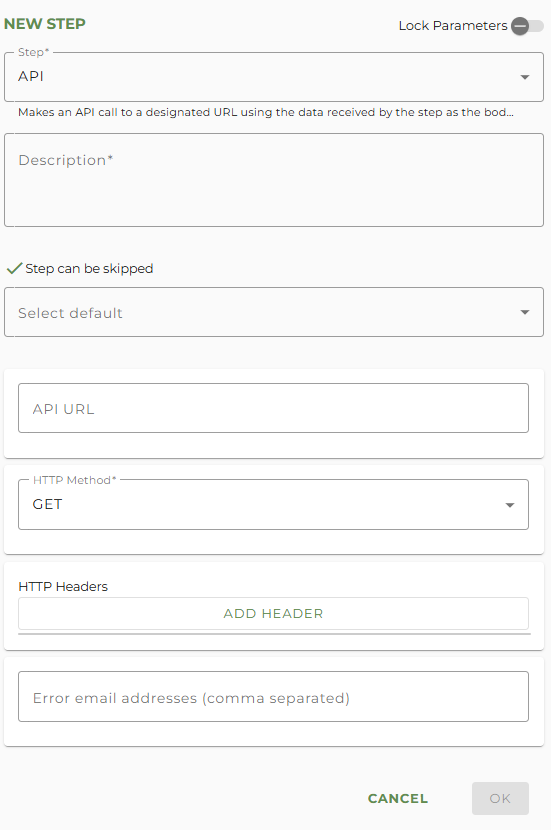
The API step is a generic API that is designed to make an API call to a designated URL using the data received by the previous step as the body. The API step HTTP Method parameter can be a POST, PUT or GET and optional HTTP headers can be created.
This step allows you to create custom fields with values or calculated values from the output file of preceding step. Custom fields are useful when you want summarized data from the source data for an itemized report. They are also useful when data from the source needs to be formatted differently for specific fields in the output, header/footer rows, or the name of the file.
To create a custom field, click on the 'Add' button.

In the modal that appears, provide a Field Name and select the type of custom field you would like to create.

Then select the fields you would like to be included in the custom field. For this example, we are selecting to sum the total value of all records for the Current Employee PreTax Contribution fields in the Standard 401k file format.

Additionally, you can click the 'Transformation Rules' to transform the custom field data. For more information on transformation rules, see the Transformation Definition - Field Rules article.

This step allows you to upload the output file to a configured Dropbox account. For more information on how to configure a client for the Dropbox Upload step on a moov, see the Connect to Dropbox article.
This step allows for you to edit the input file manually before continuing to the next moov step. An approval must be placed on this step in the moov configuration. See the Add an approver to a moov step article to add an approval.
This step consolidates the input file by identifying duplicate rows and merging them into one. A consolidation definition is required to consolidate data. For more information, see the How to create a new consolidation definition article.
This step transforms the input file into the desired output format. A transformation definition is required to transform data. For more information, see the How to create a new transformation definition article.
This step removes rows of the input file which meet predefined filter protocols. A filter definition is required to filter data. For more information, see the How to create a new filter definition article.
This step delivers the input file via FTPS to a given recipient.
Optionally, you can specify a Test directory if you need to send to an alternative host and/or directory for testing purposes. This is directly tied to the Status of a moov configuration. For more information, see the Importance of a moov Configuration's status article.
This step allows you to rename the input file using naming components of your choosing.
To add a component, click the 'Add Naming Component' button.

Then select a Naming Component Type. The Naming Component Type will depend on the type of data you wish to include in the name of the file. Below are the available options for a Naming Component Type.
DateTime - provides the DateTime of when the moov is executed in a pattern of your choosing.
Unique ID - creates a GUID (globally unique identifier)
Text - alphanumeric value
Data - specific data fields from a file transformation step
Variable - select an account specific value. Variable can be created in your detamoov account under Admin Console/Settings.
Custom Field - Predefined custom fields created for this moov definition. Custom Fields must be created before the Name File step to be available for selection. See Configure Custom Fields for more information.
Note: when creating a file name, you must explicitly state the extension of the output file. In most cases, use a Text naming component and enter in the extension in the Text field if required.

Optionally, you can specify a Test naming rule to create a different file name for testing purposes. This is directly tied to the Status of a moov configuration. For more information, see the Importance of a moov Configuration's status article.
To create an alternative testing file name, toggle off the 'Same as production rule' switch. Here you can click 'Copy from production rule' if the test file name varies slightly from the production file name, or create a new test file name using the 'Add naming component' button.

This step allows you to send an email to one or more recipients.
This step allows you to decrypt the input file using pgp with a provided private key and passphrase.
This step allows you to encrypt the input file using pgp with a provided public key.
This step allows you to use the PrismHR Time Import API. For more information, see the How to configure a client for the PrismHR Time Imports article.
This step allows for a moov configuration to authorize a connection and import to a QuickBooks Online account. For more information on configuring this step, see the Connect to QuickBooks Online article.
This step allows you to restore the data to a previously completed step. This step is useful for when you need to transform the source data, send it to receiver, and then transform the same source data again with a different transformation definition. A good example is when a retirement provider requires that the census and payroll data be sent in separate files. With this step, you can transform and send the census data, restore back to the source data, and then transform and send the payroll data.
To restore to a previous step, select the step you want to restore to from the Previous step dropdown menu.

This step sends the file from the previous step via email to one or more provided recipients.
This step delivers the input file via SFTP to a given recipient.
Optionally, you can specify a Test directory if you need to send to an alternative host and/or directory for testing purposes. This is directly tied to the Status of a moov configuration. For more information, see the Importance of a moov Configuration's status article.
This step validates the input file to meet predefined validation protocols. A validation definition is required to validate data. For more information, see the How to create a new validation definition article.
This step allows for a moov configuration to authorize a connection and import to a Xero account. For more information on configuring this step, see the Connect to Xero article.

